
Introduction
Let’s explore the fundamentals of software testing, guided by collaborative insights, clean structure, and practical test code!
Testing is a process of evaluating a software application or system to identify and resolve defects, ensure it functions correctly, and meets the specified requirements. It involves running the software with various inputs, observing its behavior, and comparing the actual outcomes to expected results.
We’ll use Java for this purpose because it’s our favorite language, but all the concepts presented in this post apply to virtually any modern programming language. You will also find references to one of our recent posts, Object-Oriented Programming in Practice, because our examples will be based on our Library Management System.
From the basics of unit testing to mocking, integration tests, and TDD, this guide illustrates what it means to write testable, maintainable, and readable code.
Whether you’re learning for interviews, contributing to a team project, or designing robust software systems, you’ll find both technical depth and stylistic best practices here!
Why Testing Matters
Software testing is a crucial aspect of software development — an integral part of it — as it ensures the quality and reliability of software products. It’s a systematic and methodical approach to assessing software quality, functionality, and performance.
Testing is an ongoing process, and the goal is not just to find and fix bugs but also to ensure that the software meets the specified requirements and functions correctly in various scenarios. Here’s what testing provides us with:
- Validation — It confirms the functionality works as intended and meets specified requirements
- Defect Detection — We can catch issues early before they reach production
- Design Feedback — Writing tests often reveals tight coupling, hidden state, or design issues that need addressing
- Safe Refactoring — Tests provide a safety net for improving code with confidence
- Executable Documentation — Well-named tests communicate expected behavior and serve as living documentation for other developers
The purpose of testing isn’t just to find bugs — it’s to verify behavior and drive better design.
Types of Testing
There are various kinds of testing used in programming. Let’s briefly mention some of them and describe what they’re used for:
| Testing Type | Description |
|---|---|
| Unit Testing | Testing individual components or units of code, such as functions or methods, in isolation |
| Integration Testing | Verifying that different components or modules of the software work together as expected when integrated |
| Functional Testing | Evaluating the software’s functionality to ensure it meets the specified requirements |
| User Acceptance Testing | Involving end-users or stakeholders to validate that the software meets their requirements and expectations |
| Performance Testing | Assessing the software’s performance in terms of speed, responsiveness, scalability, and resource usage |
| Regression Testing | Assuring that new code changes or updates do not introduce new defects and that existing functionality remains intact |
These are just examples — there are many more types — but Unit Testing and Integration Testing are the areas that all juniors should be aware of.
The Testing Life Cycle
Testing doesn’t start after development; it evolves alongside it. There is a concept of Software Testing Life Cycle (STLC), which includes:
- Test Planning — Define scope, tools, roles, and risks
- Test Design — Specify test cases and scenarios
- Test Execution — Run tests (manually or via automation)
- Defect Reporting — Track issues, context, and severity
- Regression & Retesting — Validate fixes and existing functionality
Understanding how testing fits into CI/CD pipelines and how automated testing can be integrated into the development workflow is essential for modern software development.
Structure your test plan the same way you’d structure your implementation—modular, layered, and traceable.
The Test Pyramid
A healthy testing strategy looks like a pyramid. It’s an approach of grouping software tests into groups of different granularity and gives an idea of how many tests there should be in each group.
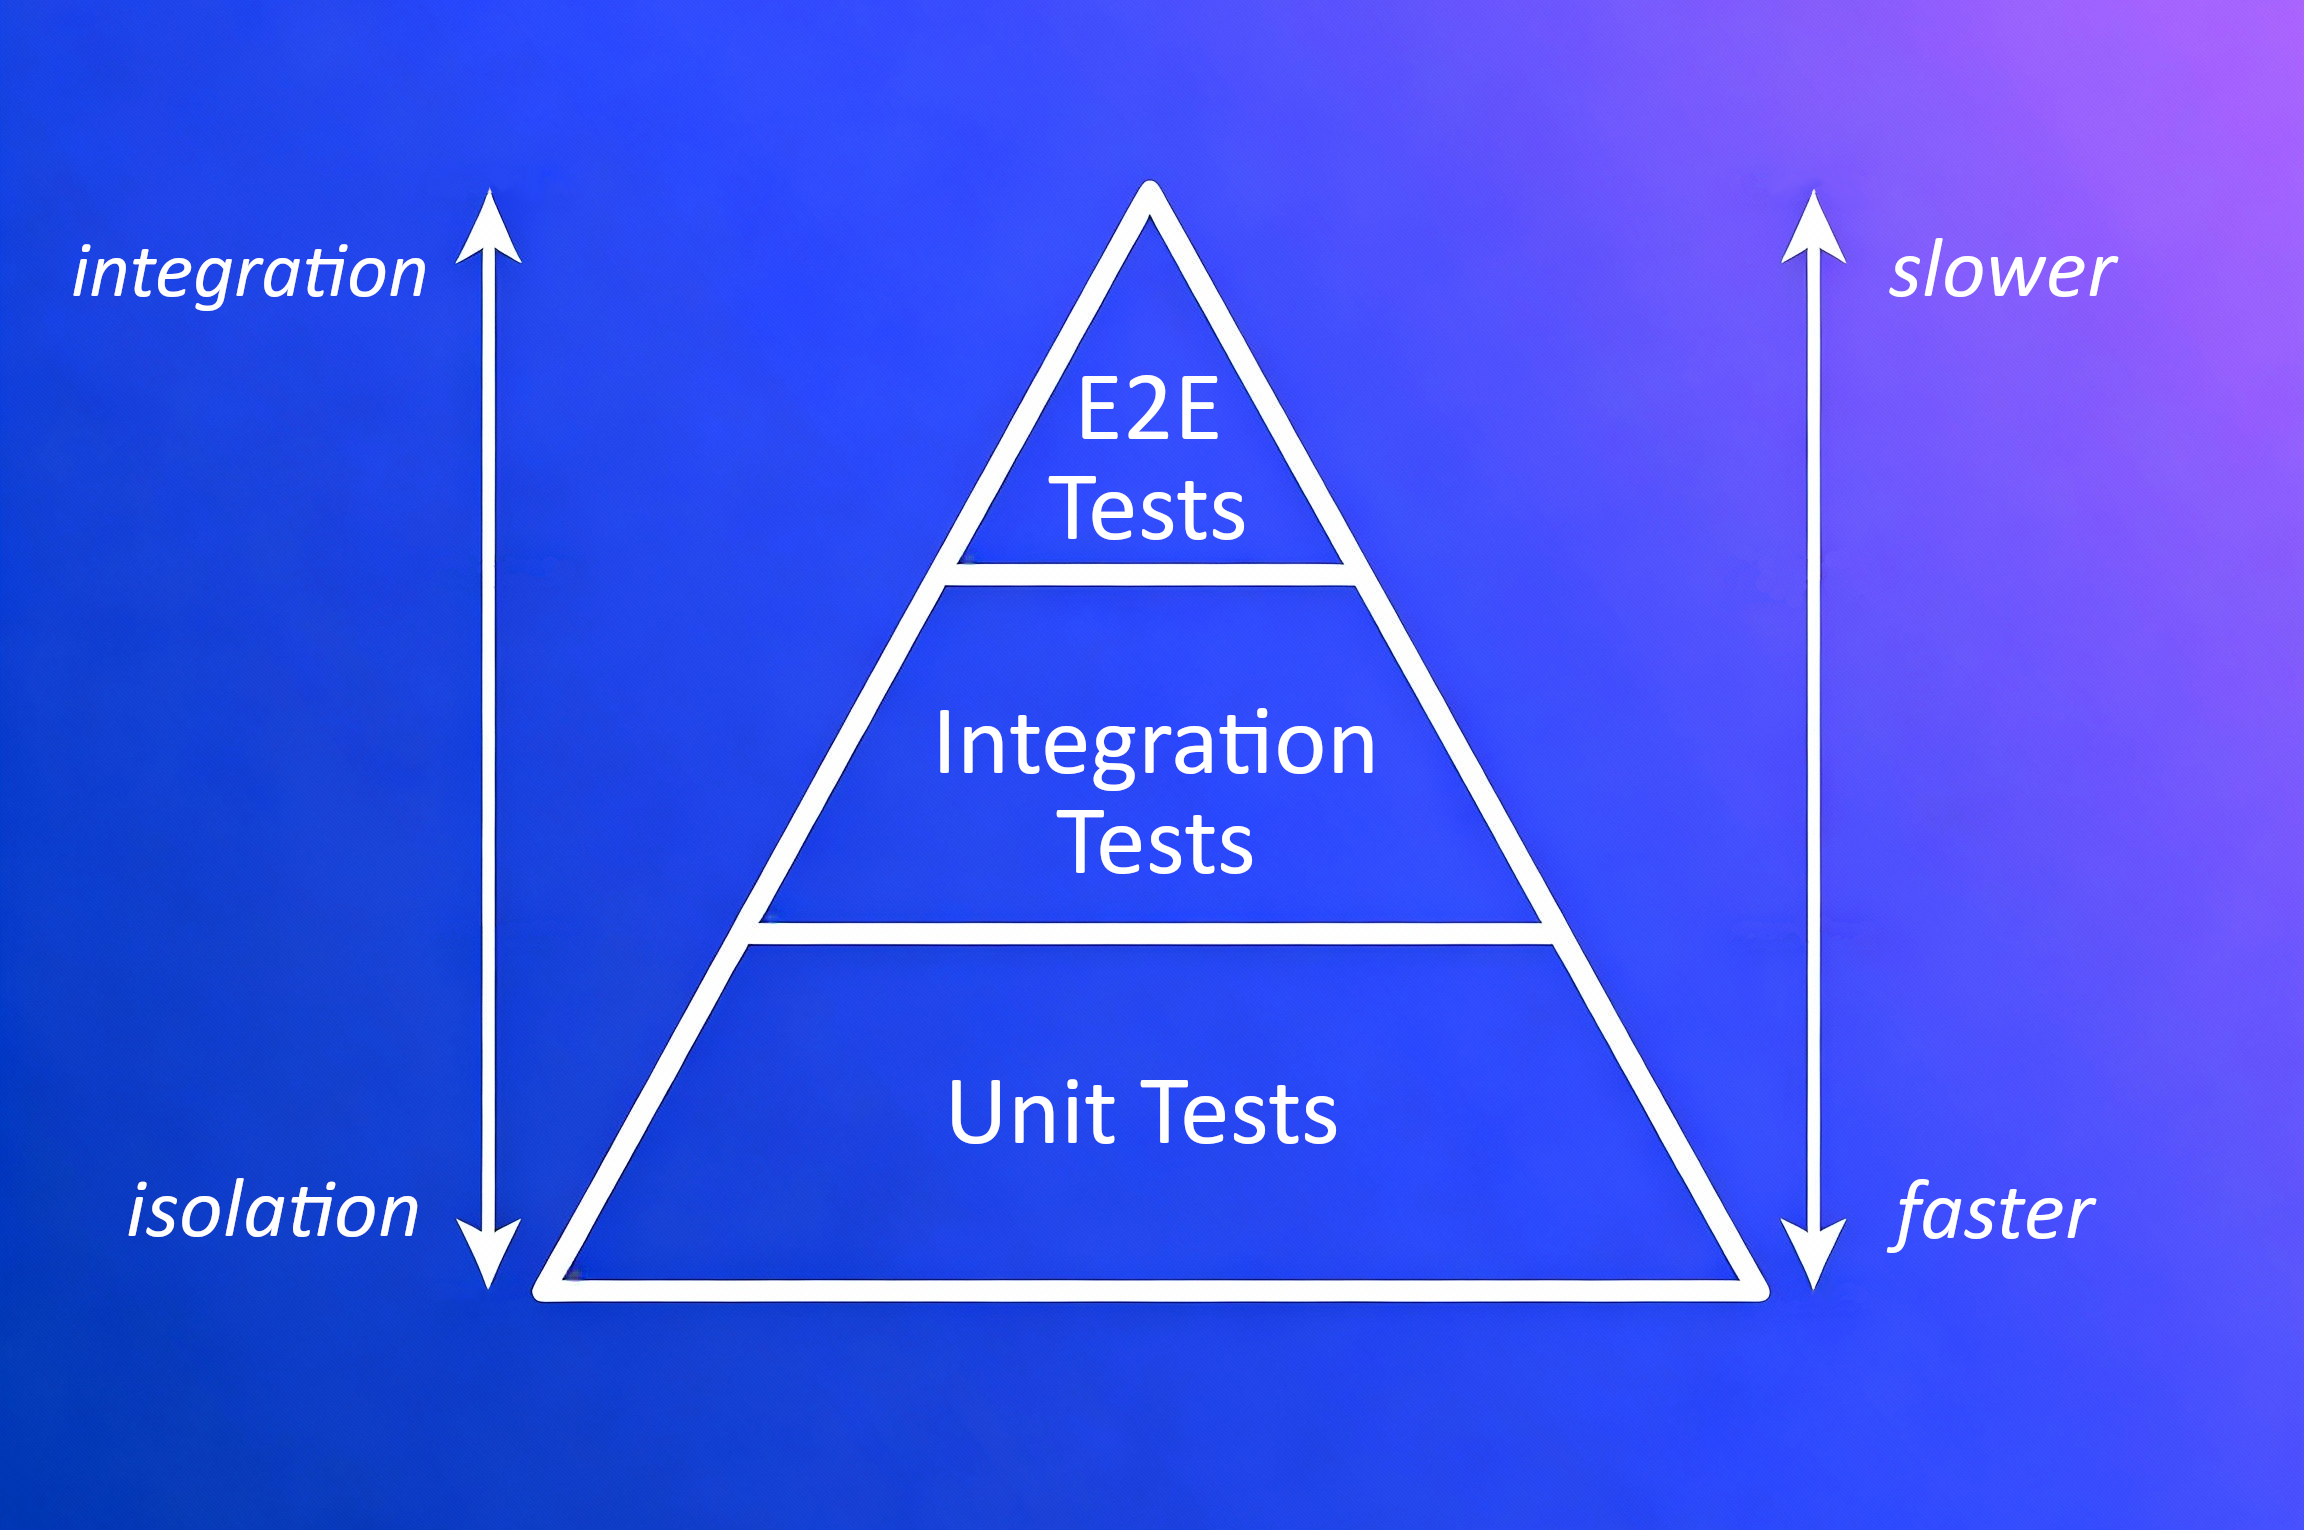 The Test Pyramid: A visual representation of test distribution
Looking from the bottom up, this pyramid consists of three layers:
| Layer | Description | Characteristics |
|---|---|---|
| Base (Unit Tests) | The most numerous tests | Isolated, fastest, fine granularity |
| Middle (Integration Tests) | Less numerous than base | More integration, slower, medium granularity |
| Top (UI/E2E Tests) | Least numerous | Most integrated, slowest, full user flows |
We can boil down this concept to two fundamental rules:
- Write tests with different granularity
- The more high-level a test is, the fewer of that kind you should have
Depending on the case, using a test pyramid approach can lead to having a fast and maintainable test suite.
Avoid the “ice cream cone” anti-pattern—too many UI tests can slow you down and make feedback loops brittle.
Test Cases and Naming Conventions
What is a Test Case?
Software requirements and the logic implementation behind them can be split into many separate bits, which can also be grouped into larger units. Most of these bits and units can be tested, and each of these tests is a Test Case. A developer should be able to write clear and detailed test cases that specify the inputs, expected outputs, and conditions for each test.
Naming Conventions for Unit Tests
We need to stop here and tell you more about naming conventions for unit test methods. A well-named test method explains what is being tested, under which condition, and what is expected.
The test name should:
- Express a specific requirement that is being tested
- Include the expected input or state and expected result
- Be a statement that expresses the workflow and output
- Optionally include the name of the tested method or class
Here are some widely used naming strategies:
| Convention | Example | Considerations |
|---|---|---|
MethodName_StateUnderTest_ExpectedBehavior | isLent_bookCreated_False() | Clear and structured |
MethodName_ExpectedBehavior_StateUnderTest | isLent_false_bookCreated() | Reads naturally |
testFeatureBeingTested | testIsNotLentWhenBookCreated() | Redundant use of “test” |
featureToBeTested | isNotLentWhenBookCreated() | May lack clarity |
Should_ExpectedBehavior_When_StateUnderTest | Should_IsLentFalse_When_BookCreated() | Verbose but expressive |
Choose a convention and apply it consistently. Good test names are part of good documentation!
The Arrange-Act-Assert (AAA) Pattern
The AAA pattern is a fundamental pattern for writing unit tests. It says that we should arrange our tests in these three steps:
Arrange — This section contains all the code required to set up the specific test. Objects are created here, and mocks are set up if being used. This includes preparing expected values and instantiating the class under test.
Act — This should be the invocation of the method being tested and grabbing the test result. Keep this section focused on a single action.
Assert — This section checks whether the expectations were met by comparing the expected and actual results. If the comparison fails, the test case will fail.
This pattern makes tests more readable and maintainable by clearly separating the different phases of each test.
Writing Unit Tests with JUnit
Let’s set up JUnit 4 to write simple and readable unit tests!
At the time of publishing this post, JUnit 5 is already available; however, for writing simple example (and non-production) tests, this does not matter much. JUnit 5 is distributed through Maven Central and requires multiple JAR files, while JUnit 4 can be set up with just two JARs.
To learn more about the JUnit library and its capabilities, please refer to the official documentation.
Setup Checklist
To set up JUnit in IntelliJ without Maven:
- Download the required JAR files:
- In IntelliJ, go to File → Project Structure → Modules → Dependencies
- Click the + icon and select JARs or directories
- Add both downloaded JAR files and click Apply
- Create a
testdirectory and mark it as Test Sources Root - Mirror your source package structure in the test directory (e.g.,
users.User→users.UserTest)
JUnit Annotations
@Test— Mark a method as a test case; each test can be run separately@Before/@After— Run before/after each test method@BeforeClass/@AfterClass— Run once per class
Keep tests focused, small, and readable.
Simple Unit Test Example
Let’s write a simple unit test that will test our User class. The method returning the User name is getName, so we can write a test like this:
1
2
3
4
5
6
7
8
9
10
11
12
13
14
15
16
17
18
19
20
package users;

import org.junit.Assert;
import org.junit.Test;

public class UserTest {                        // test class should be public

    @Test                                      // marks this method as a test case
    public void getNameTest() {                // test methods are public void
        // arrange
        var expectedName = "John";
        User user = new User(expectedName);

        // act
        var actualName = user.getName();

        // assert
        Assert.assertEquals(expectedName, actualName);
    }
}
Let’s break down what’s happening in each section:
- Arrange — We set up the expected name and create a
Userinstance with that name. This prepares everything needed for the test. - Act — We call the
getName()method on our user object. This is the actual behavior we’re testing. - Assert — We use
Assert.assertEquals()to compare the expected and actual values. If they don’t match, the test fails.
When Does Testing Simple Getters Make Sense?
You might wonder: does it make sense to test such simple things? The answer is “it depends.” Currently, the user doesn’t do anything special with its name after creation, so we’re not checking any particular logic. However, in the future there could be a new requirement — for example, the name inserted into the constructor might be transformed (e.g., appended with a number). In that case, this test would catch any regression in that logic.
Here’s a slightly more justified example — testing the setter:
1
2
3
4
5
6
7
8
9
10
11
12
13
@Test
public void setNameTest() {
    // arrange
    var expectedName = "Jane";
    User user = new User("John");

    // act
    user.setName(expectedName);
    var actualName = user.getName();

    // assert
    Assert.assertEquals(expectedName, actualName);
}
Since tests are also code, the same good practices (like Clean Code principles) should be applied to them.
Mocking with Mockito
Not every test needs the real implementation of every dependency. By dependency, we mean another class that must be instantiated and is used by the class being tested. That’s where mocking helps isolate units.
Mocking is a process used in unit testing when the unit being tested has external dependencies. Its purpose is to isolate and focus on the code being tested — not on the behavior or state of external dependencies. We create objects that simulate the behavior of real, dependent objects.
Types of Test Doubles
During testing, we distinguish the following variants of “not real” dependencies:
| Type | Description |
|---|---|
| Dummy | Passed but never actually used |
| Stub | Implements just enough behavior to allow the unit under test to execute; returns fixed data |
| Mock | Similar to stub, but the test also verifies that the mock was used correctly (interactions are checked) |
| Fake | A realistic but simplified implementation |
| Spy | Wraps a real object and observes its behavior |
Setting Up Mockito
To use Mockito, you’ll need to add the Mockito JAR to your project using the same process as for JUnit.
Unit Test Example with a Mock
Let’s see how a classic “mock” of a Book class can be used to test one of the Library functionalities. We’ll test the findBook method by mocking the Book abstract class:
1
2
3
4
5
6
7
8
9
10
11
12
13
14
15
16
17
18
19
20
21
22
23
24
25
26
27
28
29
30
31
32
package libraries;

import books.Book;
import org.junit.Assert;
import org.junit.Test;
import org.junit.runner.RunWith;
import org.mockito.Mock;
import org.mockito.runners.MockitoJUnitRunner;

import static org.mockito.Mockito.when;

@RunWith(MockitoJUnitRunner.class)             // keeps tests clean, improves debugging
public class LibraryTest {

    @Mock                                      // marks this object as a mock
    Book mockedBook;

    @Test
    public void findBook_returnsBookWhenExists() {
        // arrange
        var ISBN = "1234";
        when(mockedBook.getISBN()).thenReturn(ISBN);  // define mock behavior
        Library library = new Library();

        // act
        library.addBook(mockedBook);
        Book result = library.findBook(ISBN);

        // assert
        Assert.assertEquals(mockedBook, result);
    }
}
Key points about this example:
@RunWith(MockitoJUnitRunner.class)— Initializes mocks and keeps tests clean@Mock— The crucial Mockito annotation that marks an object as a mockwhen(...).thenReturn(...)— Mockito’s fluent interface to set mock behavior; we should mock only the necessary (executed by the test) behavior
This is a simple example to demonstrate the idea of mocking. Normally we’d mock more representative dependencies, like services or repositories.
Integration Testing
Let’s now validate that components work together. Integration Testing is a type that focuses on evaluating the interactions and connections between different components or modules within a software application. It’s essential for verifying that the various parts of an application can work together.
Key Characteristics
| Aspect | Description |
|---|---|
| Purpose | Identify issues related to the interaction, data flow, and communication between different modules |
| Scope | Focus on testing the integration points or interfaces between components; medium granularity |
| Dependencies | Often involve real or realistic dependencies, such as databases, external services, and APIs |
| Execution Environment | Typically performed in an environment that replicates or closely simulates the application’s runtime |
Integration Testing Tools
Here are some popular tools for integration testing in Java:
| Tool | Description |
|---|---|
| Spring Test | Part of the Spring ecosystem; provides support for integration testing with features such as database transaction management and Spring context loading. Includes @SpringBootTest annotation. |
| Arquillian | Designed to test Java middleware; can manage the lifecycle of containers (application servers) and deploy components for testing. Supports WildFly, GlassFish, Tomcat, and others. |
| REST-assured | Specifically designed for testing REST services; offers a fluent DSL (Domain Specific Language) for writing tests; integrates with JUnit and TestNG. |
| DbUnit | JUnit extension for database interaction testing; can set up the database into a known state before tests and clean it up after. |
| Citrus Framework | Provides capabilities for integration testing of messaging protocols and data formats; supports REST, SOAP, JMS, and more. |
| Testcontainers | Provides lightweight, throwaway instances of common databases, Selenium web browsers, or anything that can run in a Docker container. Ensures consistent environments independent of local setup. |
When choosing an integration testing framework, consider the nature of your application, the components you’re integrating, and the specific needs of your testing scenario.
Integration tests take longer to run—focus them on key workflows and boundaries.
Integration Test Example
Let’s compare our earlier mock-based unit test with an integration test. The key difference is that we use real dependencies instead of mocks:
1
2
3
4
5
6
7
8
9
10
11
12
13
14
15
16
17
18
19
20
21
22
23
24
25
26
package libraries;

import books.Book;
import books.PrintedBook;
import org.junit.Assert;
import org.junit.Test;                // No Mockito imports needed

public class LibraryTest {
                                      // No @Mock annotation
    @Test
    public void findBookWhenAddedToBooks() {
        // arrange
        var ISBN = "1234";
        Book printedBook = new PrintedBook(  // Real object, not a mock
            "Title 1", "Author 1", ISBN, 100, "hardcover"
        );
        Library library = new Library();

        // act
        library.addBook(printedBook);
        var actualBook = library.findBook(ISBN);

        // assert
        Assert.assertEquals(printedBook, actualBook);
    }
}
Notice the differences from the unit test:
- No Mockito runner or annotations
- We create an actual
PrintedBookobject instead of mocking it - The test validates the real interaction between
LibraryandBook
Test-Driven Development (TDD)
TDD is a software development process, or methodology, that emphasizes writing tests before writing the actual code for a software feature or functionality.
The Red-Green-Refactor Cycle
TDD is based on a cycle with three phases:
Red — Write a test case that defines the expected behavior of the code you’re about to write. This phase is called “red” because the test fails initially — there’s no code to satisfy it yet.
Green — Write the minimal amount of code necessary to make the failing test case pass. Since the test passes now, this step is referred to as “green.”
Refactor — Refactor the code to improve its structure, readability, and performance while keeping the test green. This is where you clean up without breaking functionality.
TDD encourages developers to write only the code necessary to pass the currently failing test case, which helps prevent over-engineering and ensures that the codebase remains focused on meeting the requirements.
Benefits of TDD
- Improved Code Quality — Developers are forced to think about and define desired behavior before writing the implementation
- Easier Refactoring — With a suite of tests in place, developers can make changes with confidence, knowing that regressions will be caught
- Clearer Specification — Writing tests first provides a clear specification for how the code should behave; it also reveals potential misunderstandings early
- Regression Detection — As software grows, tests can quickly identify if changes introduce any regressions
- Documentation — Tests provide documentation for how the system is supposed to behave
- Design Benefits — Encourages development of modular and decoupled code, which is easier to maintain and extend
- Reduces Defects — Issues are identified and addressed early in the development process
Challenges of TDD
- Learning Curve — For teams new to TDD, there can be a steep learning curve
- Initial Time Overhead — TDD can take longer initially, though this time is often recovered later due to fewer bugs
- Overemphasis on Unit Tests — Can lead to an overemphasis on unit tests at the expense of integration or acceptance tests
- Incomplete Coverage — TDD doesn’t guarantee complete test coverage; edge cases can still be missed
- Maintenance Overhead — As the codebase changes, tests also need to be maintained
- Not Always Suitable — TDD might not be suitable for projects with vague requirements or exploratory coding phases
Use TDD for logic-heavy modules or areas where change is expected.
TDD Example: Adding a New Feature
Let’s walk through a TDD example. We have a new requirement for our Library Management System: while listing available books, we should specify which are lent and which are not by showing “Is lent: yes/no” at the beginning of the book information.
Step 1: Red — Write the First Failing Test
1
2
3
4
5
6
7
8
9
10
11
12
13
14
15
16
17
18
19
20
21
package books;

import org.junit.Assert;
import org.junit.Test;

public class PrintedBookTest {

    @Test
    public void newBookIsNotLent() {
        // arrange
        var printedBook = new PrintedBook(
                "Title 1", "Author 1", "1234", 100, "hardcover"
        );

        // act
        var bookInfo = printedBook.toString();

        // assert
        Assert.assertTrue(bookInfo.contains("Is lent: no"));
    }
}
This test fails because toString() doesn’t include the “Is lent” information yet.
Step 2: Green — Write the Simplest Solution
1
2
3
4
5
6
7
8
9
10
package books;

public abstract class Book {
    // ... existing fields and methods ...

    @Override
    public String toString() {
        return "Is lent: no, Title: " + title + ", Author: " + author + ", ISBN: " + ISBN;
    }
}
The test now passes! But this hardcoded solution won’t work for lent books.
Step 3: Refactor — Nothing to Refactor Yet
At this point, there’s not much to refactor. Let’s add another test case.
Step 4: Red — Add the Opposite Case
1
2
3
4
5
6
7
8
9
10
11
12
13
14
@Test
public void borrowedBookIsLent() {
    // arrange
    var printedBook = new PrintedBook(
            "Title 2", "Author 2", "5678", 200, "paperback"
    );

    // act
    printedBook.setLent(true);
    var bookInfo = printedBook.toString();

    // assert
    Assert.assertTrue(bookInfo.contains("Is lent: yes"));
}
This test fails because our toString() always returns “no”.
Step 5: Green — Add Logic to Handle Both Cases
1
2
3
4
5
6
7
8
9
10
11
@Override
public String toString() {
    String isAvailable;

    if (isLent) {
        isAvailable = "yes";
    } else {
        isAvailable = "no";
    }
    return "Is lent: " + isAvailable + ", Title: " + title + ", Author: " + author + ", ISBN: " + ISBN;
}
Both tests now pass!
Step 6: Refactor — Simplify the Condition
1
2
3
4
5
@Override
public String toString() {
    var isAvailable = isLent() ? "yes" : "no";
    return "Is lent: " + isAvailable + ", Title: " + title + ", Author: " + author + ", ISBN: " + ISBN;
}
The code is cleaner, and all tests still pass. We’ve completed a full TDD cycle!
Best Practices for Writing Tests
Before we wrap up, here are some key good practices for writing tests:
Test meaningful logic — There’s no sense in testing simple single call-outs to other libraries, but when there’s even a trace of logic, you should create a test case for it
Cover both positive and negative scenarios — Test cases should not only check the proper behavior but also negative scenarios. Include regular cases and corner cases.
Base tests on requirements and common sense — Cases should be driven by actual requirements, supplemented by your understanding of edge cases
Keep tests readable — Tests should be readable like all other code. Use the AAA pattern to organize your cases.
Focus on high business value — Code coverage is important, but prioritize areas that have higher business value
Remember: tests are code too — Apply Clean Code principles to your tests as you would to production code
Designing for Testability
To write testable code, follow these principles:
- Favor composition over inheritance
- Avoid static state and singletons
- Use dependency injection
- Keep functions small and focused
- Rely on interfaces, not concrete classes
Code that is easy to test is often better designed by default.
Key Takeaways
- Testing is a wide topic, and we’ve only touched the basics — more details will come in future posts
- Think about testing from day one, not the last day
- Keep your test pyramid balanced: fast unit tests at the base, few UI tests at the top
- Use naming conventions to make tests self-explanatory
- Mock responsibly — don’t overdo it; only mock what’s necessary
- TDD can be a powerful tool when applied thoughtfully — start by practicing with simple applications
- Clean code and testable code go hand-in-hand — remember, tests are also code!
Stay Tuned!
This post covered the Junior level fundamentals of software testing. As you progress through our roadmap, future posts will explore more advanced testing topics and techniques.
Stay tuned for more in-depth content as you advance through your software engineering journey!